Hand Painted Pottery with Animal and Dog Art by Nan Hamilton Boston MA

Designing Pottery: Deciding on Glaze Techniques


While there are times I'll change direction when I'm working on a pot, generally speaking, before I begin, I think through every step of the decorating process. For me, it's important to work out exactly how I plan to proceed otherwise I can paint myself into a corner!

When I first started potting, my favorite way to decorate a pot was to carve into the surface of the pot when it was partly dry. A slip (clay about the consistency of watery mayonnaise) colored with oxides can be applied after trimming. A pattern can be formed by gouging through the slip to the original clay beneath. I made the sugar bowl on the left in 1974, carving through black iron slip to the dark brown clay beneath and left it unglazed. It's been sitting on my kitchen table ever since. Sometimes I covered the iron slip with a white glaze (center pot, 1980) for a softer look. I also worked with a cobalt slip with a shiny white glaze (right pot, 1981) for many years. This carving technique, sgraffito, is great for line drawings or designs. You can use any color slip, glaze the pot or not, and any glaze can be used as long as the slip color can penetrate the glaze.


The surface can also be carved without slip. Usually this is done on porcelain, like the plate above. You can add clay, too, though this is not a technique that I've used much. You can pierce the clay, as in the nightlight, or cut the rim to conform to your design. These techniques are done when the pot is still leather-hard.


Painting with underglazes is one way to decorate with color. You can work either directly on the clay or on top of a light colored glaze. Porcelain provides vivid and precise results. If the surface has been sanded smooth, painting on porcelain is akin to working with watercolors on paper. It is important to apply the underglazes correctly, neither too thin (weak color) nor too thick (blistering and other problems). It is extremely helpful to make test tiles for clues to color and application. What you see is not always what you get at this stage.


You can also paint with glazes. Our studio glazes work well for the softer, more variable colors. Some of the newly available glazes from Spectrum, Laguna, etc. yield brilliant, enamel-like surfaces. In painting with glazes, the biggest issue is getting the glaze application sufficiently thick. Usually several coats must be applied. Once again, what you see is not always what you get at this stage.


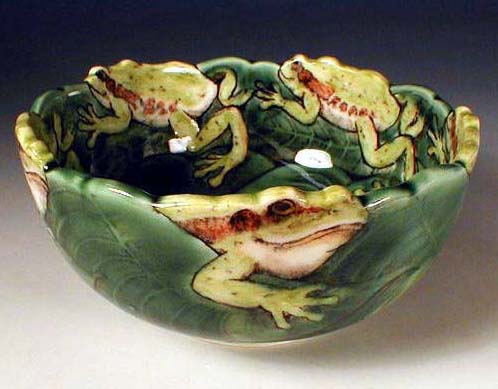
Another dimension can be added by masking areas of the pot either with wax resist, latex resist, masking tape, or commercial stickers. Sometimes it's simplest to dip the pot in glaze, then remove the glaze from the desired area with a needle tool and clean with a damp Q-tip. This frog pot has been carved, painted (the frogs), latex applied around them, dipped in transparent, waxed over the transparent, dipped in green, then painted to define the leaves. This pot was completely planned out even before I sat down to throw.


Another way to work is to lightly draw a design on a leather-hard pot, apply liquid latex around the design, then dip or paint slip on the pot. I used porcelain over red clay on this pot. When the latex is removed, the second clay stays on the surface of the pot. When you're ready to decorate, you have the advantages of two kinds of clay to work on. On this pot, I painted the porcelain with underglazes, masked around the birds, then dipped the pot in a transparent glaze, leaving the red stoneware exposed.


Return to Designing Pottery home page.


Home - Gallery - Mudville - Dog Park - BARK - Nan's Workshop


No unauthorized reproduction. Thank you. Text and Photos Copyright © 2006 Nan Hamilton